Click for STA & SAB pictures, videos and more
Assignment #3:
Layers, masking and blending - Creation of an on-line advert.
Step 1 - Setup
Once you've saved the gear and the handshake jpg's to your folder on the computer, open them both up in Photoshop. Create a blank new document 8"x10" at 72ppi. In Photoshop, go do the windows>arrange>tile horizontally menu and then click on the picture of the gear. You can hold shift down and then drag the gear picture over to your blank document. Do the same thing with the handshake picture.
You'll notice that in the new document those pictures are GI-NORMOUS! We can close the gear and handshake jpg's and maximize our work PSD document now. Let's get into the habit of good PS etiquette, which is the name our layers. To do so, simply double-click on top of the words layer2 in the layers panel, and rename that to handshake. Do the same for the gear layer. We now need to resize those pictures so they fit onto our work stage. To do so, zoom WAAAAYYYYY out ('z' chooses the zoom tool, then you'll notice the magnifying glass has a '+' in it, hold down alt and it turns into a '-', click a few times to zoom out). Now, to resize that sucker, we need to go back to our select tool (v) and either
file-resize.png
hit Command+ t, or click on the checkbox in the top menu that says 'show transform controls' (in my opinion remembering the command-t way is easier in the long run). You should see a bounding box around your handshake picture now. We could hold shift down (which forces the proportions to stay the same) and resize the picture, or, once we've licked on one of the edge boxes, go up to the top menu and type in 20% (make sure to click the little chain-link see on the picture above). Roughly center our hand. Do the same thing with the gear, make it roughly the same size as the hand. Problem is - we can't really see the gear since it is behind our hand at the moment. To work on the gear layer we We want to hide the handshake layer (click on the eyeball next to handshake to hide it from view). Now click on the layer->Layer Mask-> Try both Hide all AND Reveal all. Experiment a little.


Layer mask
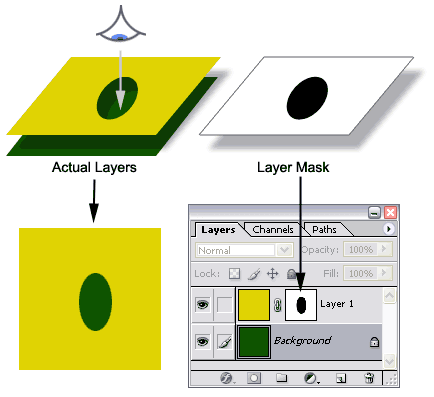
Select the mask on your handshake layer (there should be a highlighted box around the 'white mask' thumbnail in your layers panel - see the picture at left).
The way that masks work is that anything 'selected with black' will blocked out from the selected layer (think of it as being cut out w/ scissors). In the picture at left you can see roughly how a layer mask works. On a layer mask, whatever is painted black is made invisible. Whatever is white is visible. In our case, what we are going to do is to choose the default colours of black for a foreground colour and white as a background colour. This is done by either clicking on the tiny black/white box next to the foreground/background colour chooser at the bottom of the tools panel, or by hitting 'D' (for default). You can now either go and paint over the areas in the handshake layer that we don't want (everything but the arms and the hands). The other quick way of doing this is to use combinations of quick select, lasso & magic wand (using the selection add/subtract methods discussed in class) to pick everything but the hands/arms then fill them with a solid black colour using the paint bucket (which is the equivalent of painting over them with black).
Refining masks
Now - if you did a quick and dirty job you'll find that the edge isn't great and you've likely gotten rid of their poor skin. Press the "X" Key to switch the foreground and background colors. With white as the foreground, choose a smaller brush and zoom WAY in and paint back the areas you want to keep on the mask layer. Notice as you paint with white, the image comes back. Don't you love layer masks!
We're now going to duplicate the gear layer by selecting the layer and layer>duplicate or by simply dragging the layer name to the new layers icon.
Next we're going to create a layermask for the new gear layer. We will then select the layermask icon (as we did in step 2) and paint over the handshake area in black (you can do a quick job of it, because the pixel area has been selected (you can see the little 'ants marching' - dotted lines around the outside) we can ONLY paint within the boundary of the selection. What we're doing is painting over the gear and making it disappear everywhere on the inside, so the handshake can be seen. We will leave the outside of the gear as a 'frame' for the hands shaking. We want to have the fingers out over the edge though, to give the illusion of 3 dimensionality to the piece so zoom in and take care to ensure that anywhere the fingers overlap the edge of the gears, they're masked so they're visible


Colour Adjusts using Layer Fill/Saturation
Next we're going to desaturate the picture with a hue/saturation adjustment to the layers. To do this we'll click ont he little black/white icon at the bottom
external image adjlayericon.jpg
of the layers panel which will bring up a menu where we'll want to select a hue/saturation layer. We'll take the hue and saturation both down to 0. Now let's click on the colorize button on that menu and choose a value of hue of 200 and a value of saturation of 25 (keeping lightness at 0). You'll notice a nice blueish hue to your work
Hue/Saturation adjust
Because what we will be working on will be another type of steps entirely we will create 2 groups using the create group button at the bottom of the layers panel next to the new layer icon. In the first layer we will drag all of our layers we've worked on so far. You can see that as you add them they all indent slightly in the panel, this lets us know they're part of the group1 (which we'll rename to background). We'll rename group 2 to border.
We will choose another hue/saturation adjustment layer from the bottom. Choose the layer mask icon in this hue/saturation layer and we will now draw a rectangular marquee in that mask.
If it's slightly off, simply let go of the mouse and use your arrow keys to 'nudge' the selection up/down left/right. Keeping the rectangular marquee on the screen, let's change it's brightness by double clicking the hue/saturation layer's adjustment thumbnail on the left and adjusting brightness to 50. It looks awful doesn't it? Because what we're doing is making the frame around the outside of the center of the image, we want to paint the entire rectangle in the middle black so that it is 'cut out' of this whiter mask. Choose the black paint bucket tool and fill the central rectangle in the layer mask area.
Because that leaves the edge very harsh, let's soften it by going to the bottom of the layers panel and choosing the button that says Fx. From that we want to choose the Inner Glow. You should choose the settings seen at left (the blue is a colour of your choice).
Before we leave the effects, let's ALSO include a Bevel and Emboss and choose the settings from the picture below.


Text addition
This leaves only a few last things to do. We're advertising the LCDSB in this case, so let's go ahead and consider what we want to say in our statement. Likely something about technology, and the LCDSB, so let's choose a script-type font (I chose Mistral, but you choose whatever
script fonts are available to you on your computers. Next I chose the colour as white, and the font-size as 90 point. You'll wind up creating 4 separate font layers each under the 'border group' and the layer adjust that's there. In one you'll type' London', in another 'District',
then 'School', then 'Board'. Arrange them generally how I have them. Notice how when they're outside the mask area, they are greatly reduced in transparency? Additionally, at the top right of the layers panel, I chose to make the opacity of each of those 4 text layers 60% (that means only 60% of the information will be 'pushed through' to be used in the layer.
Finally I made one last text layer, saying 'Technology' and kept the opacity of that layer at 100%. To this layer I went to the effect panel and added a slight drop-shadow. You should wind up with something that looks like this when you're done.

While you've been saving it as a psd along the way, I now want you to export it as a jpg with a (close as you can get to) 250KB filesize and submit it into your folder in the handin folder with the name
